How to Use RCP, SCP, and TFTP 6 With FII-PE7030, FII-BD7100 Development Board
Table of Contents
Section 1: Using RCP and SCP to Transfer Files 3
© 2020 Fraser Innovation Inc ALL RIGHTS RESERVED
Without written permission of Fraser Innovation Inc, no unit or individual may extract or modify part of or all the contents of this manual. Offenders will be held liable for their legal responsibility.
Thank you for purchasing the FPGA development board. Please read the manual carefully before using the product and make sure that you know how to use the product correctly. Improper operation may damage the development board. This manual is constantly updated, and it is recommended that you download the latest version when using.
Official Shopping Website:
Section 1: Using RCP and SCP to Transfer Files
*In order to follow along to this tutorial, you will be required to have Ubuntu 16.04.01 already installed on your Virtual Machine using Oracle’s VirtualBox. Because this tutorial is geared towards Ubuntu 16.04.01, using other versions may have differences between the execution of commands. You will also need to have TFTP, PetaLinux, PuTTY and your development board set up.
Because we have already gone through the RCP and SCP command basics in the Basics documentation, we will not be covering them again here.
As the system in the development board is still Linux, all of the previous commands for operating on a different Linux computer still hold. We will be able to do the exact same thing.
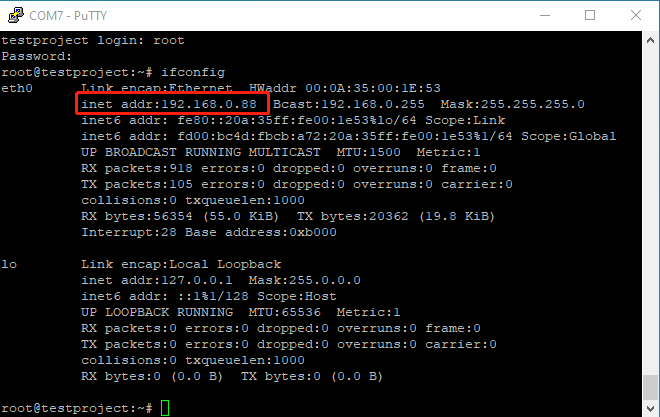
First, we will need to check the IP address of the system in the development board. We can do this with the basic ifconfig command. As we can see below, our development board’s IP address is 192.168.0.88.
First, we will create a new folder named RCPtests on the development board system using the mkdir command.
mkdir /home/RCPtests
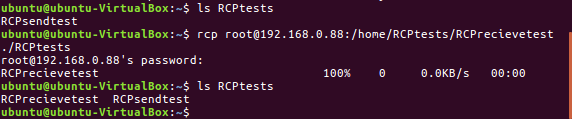
We will use RCP to copy the file RCPsendtest from the directory home/ubuntu/RCPtests/ on the computer and paste it to the directory /home/RCPtests/ on the development board.
rcp /home/ubuntu/RCPtests/RCPsendtest root@192.168.0.88:/home/RCPtests

Next, we can check to verify if the file is where we want it to be by going into PuTTY and using the ls command.
ls /home/RCPtests
![]()
Thus, we can see that the file did get transferred successfully.
We will now create a new file named RCPrecievetest in the development board system. We can do this by using the touch command, and we will create the file inside the RCPtests folder.
cd /home/RCPtests
touch RCPrecievetest

We can use the RCP command from our computer again to issue a command that allows for us to receive the file from the development board, like so.
rcp root@192.168.0.88:/home/RCPtests/RCPrecievetest ./RCPtests
Next, we will demonstrate the SCP command.
First, we will create a new folder named SCPtests on the development board system using the mkdir command.
mkdir /home/SCPtests
We will use SCP to copy the file SCPsendtest from the directory home/ubuntu/SCPtests/ on the computer and paste it to the directory /home/SCPtests/ on the development board.
scp /home/ubuntu/SCPtests/SCPsendtest root@192.168.0.88:/home/SCPtests

Next, we can check to verify if the file is where we want it to be by going into PuTTY and using the ls command.
ls /home/SCPtests

Thus, we can see that the file did get transferred successfully.
We will now create a new file named SCPrecievetest in the development board system. We can do this by using the touch command, and we will create the file inside the SCPtests folder.
cd /home/SCPtests
touch SCPrecievetest

We can use the SCP command from our computer again to issue a command that allows for us to receive the file from the development board, like so.
scp root@192.168.0.88:/home/SCPtests/SCPrecievetest ./SCPtests

Section 2: Using TFTP
When the development board first boots up, you will see the following prompt:
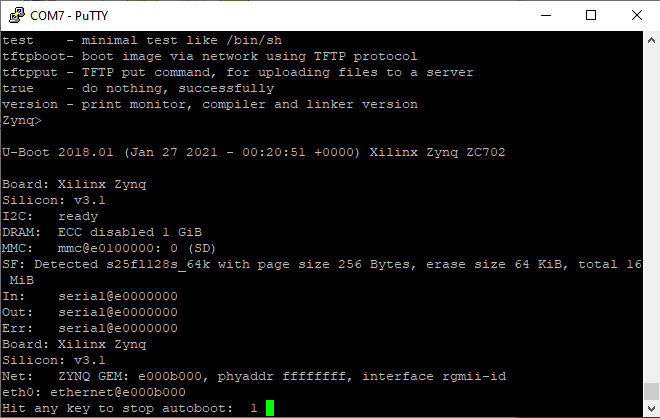
If you want to boot using an image transferred using TFTP, please hit any key on your keyboard while the timer hasn’t reached 0.
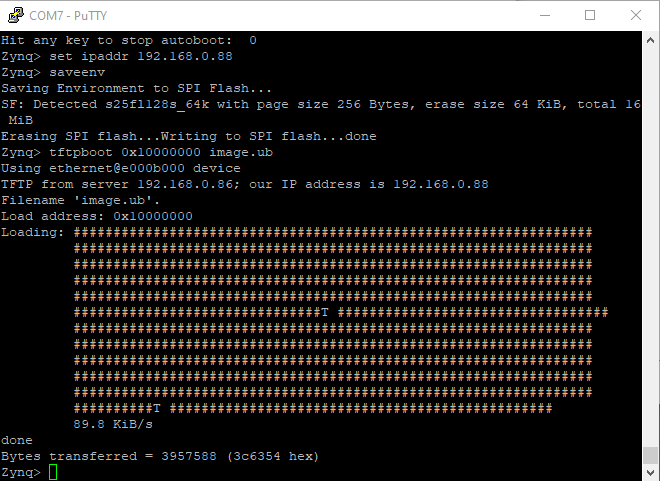
Next, enter the following commands to configure the IP address of the system on the development board. Note that once you do these once, you no longer need to do it in the future as the change is written to the flash drive on the development board via the saveenv command, unless your IP address changes.
set ipaddr 192.168.0.88
saveenv
We will execute the following command to transfer the image file from our ubuntu system, which is the server, to the development board.
tftpboot image.ub
Finally, we will use the following command to boot using the image we just transferred.
bootm
You should be able to boot into Linux without any issues.

…